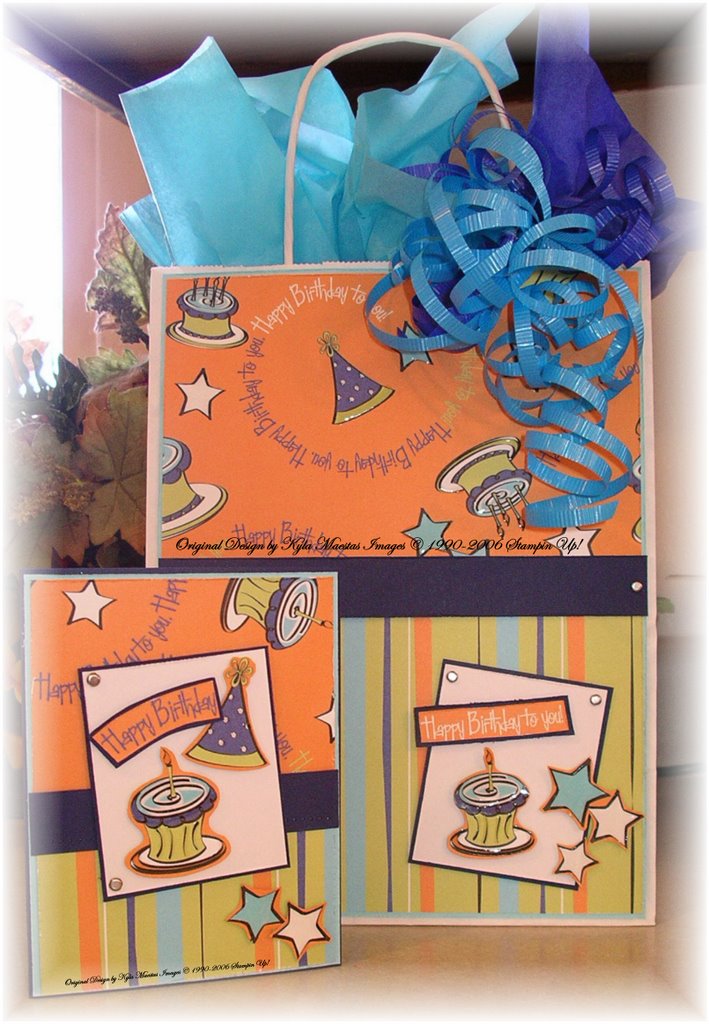
 My son's birthday is right after Thanksgiving so we decided to celebrate birthdays together with a combined party. I created this bag and card for my son, celebrating his 9th birthday. The bag features no stamps, it is very unlikely for me to create something without using stamps but this new AMM paper really had everything I needed to create a cool bag and matching card. Images were cut out of the patterned paper and popped up to create the card and bag. I added some crystal effects to the images on the bag and card to accent some of the pieces.
Saturday, November 18, 2006
"All Boy" Birthday Gift Set
My son's birthday is right after Thanksgiving so we decided to celebrate birthdays together with a combined party. I created this bag and card for my son, celebrating his 9th birthday. The bag features no stamps, it is very unlikely for me to create something without using stamps but this new AMM paper really had everything I needed to create a cool bag and matching card. Images were cut out of the patterned paper and popped up to create the card and bag. I added some crystal effects to the images on the bag and card to accent some of the pieces.
"Girlfriends" Gift Set
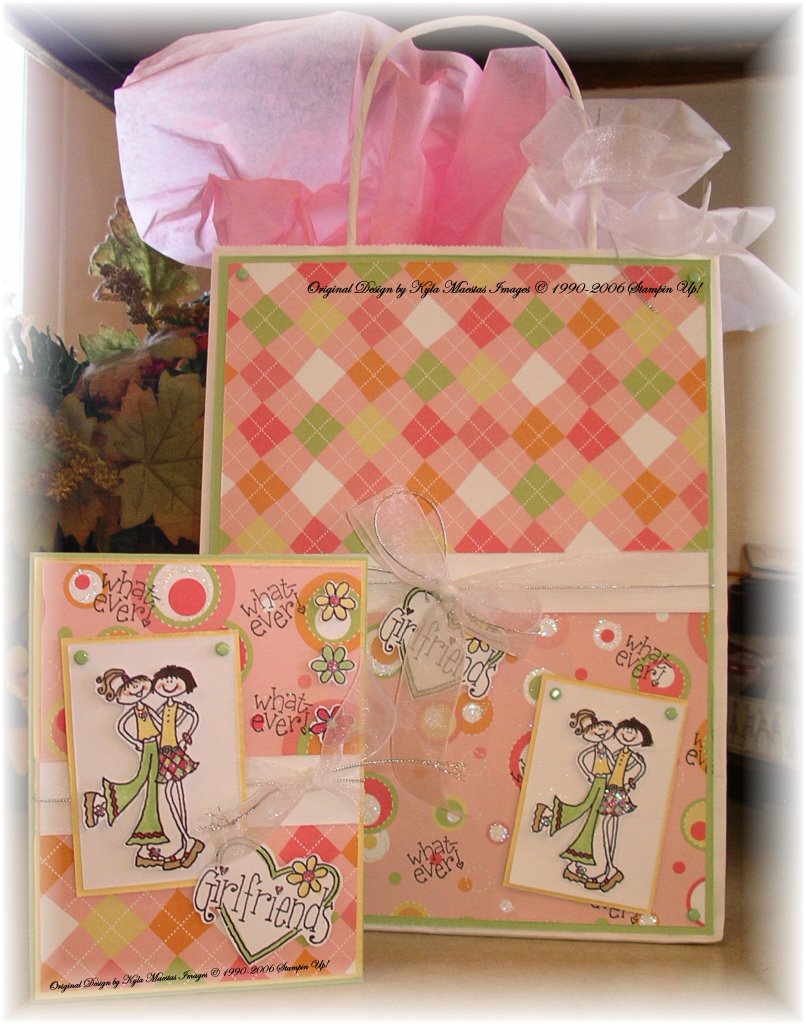 My daughter is celebrated her 8th birthday last night with several of her friends. I wanted to create a gift bag and card that show off her fun personality and love for friends. I have had this set for a long time (3 years) and I think it has been at least 2 years since it was last used. With this new look I am sure to use it more often.
Gift Bag Details: I used paper from the DCWV Teen Paper Stack with the "Girlfriends"stamp set from Stampin' Up! The girls are cut out and popped up on the white cardstock to create a 3-D look. I added glitter to the circles for some added flair.
I am very pleased with the way this turned out and so was the birthday girl. All of her girlfriends have requested a bag and card just like hers for their birthdays, it looks like I will have a stack of these to make!
Friday, November 17, 2006
"This is For You"
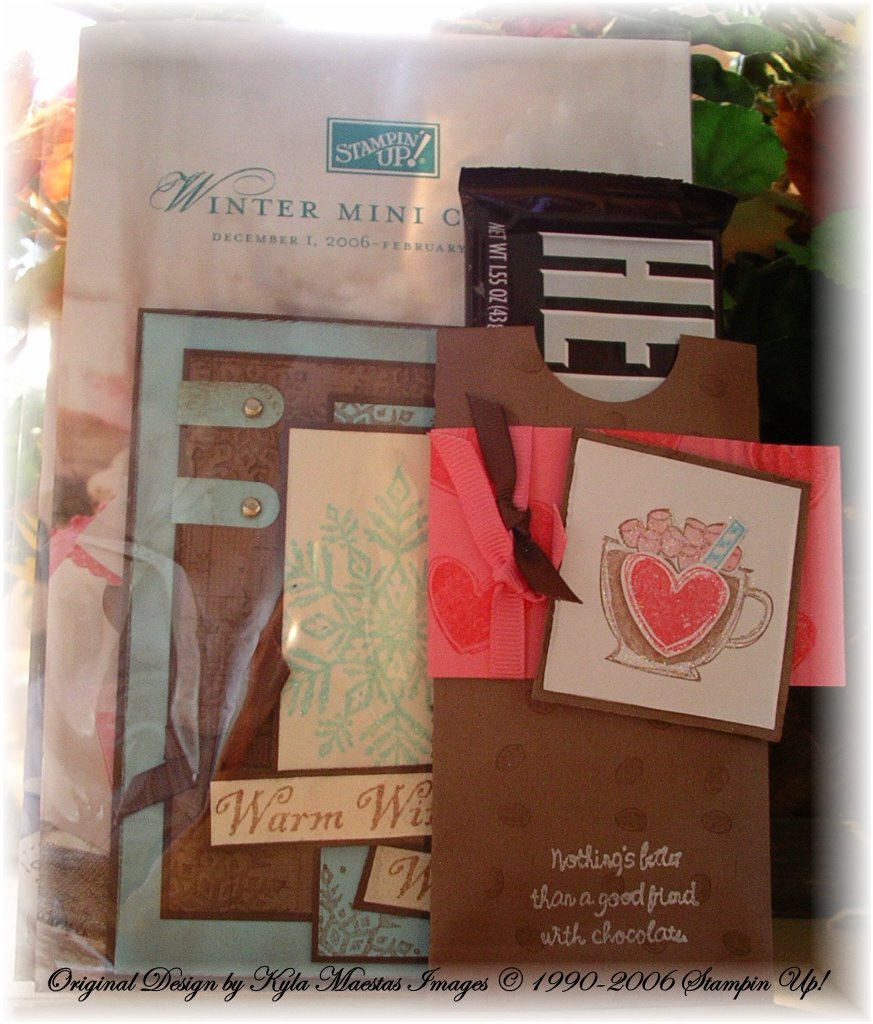 I am participating in BootCamp, a training for Stampin Up Demonstrators. One of our tasks this week was to create 3 TIFU packets (this is for you) and give them to cold contacts. I put together a small packet in a cello bag with a technique booklet, winter mini catalog, business card and some stamped goodies (Snowflake Challenge Card SC92 and a candy bar wrapper I created using Like it a Latte). I created 4 of these and passed them around to people I met in the community while running my errands. This was a task designed to help us with cold contacting, everyone seemed very excited to receive such a fun little gift. I am very curious to see what happens next. I gave my TIFU packets to a bank teller, teacher, grocery store clerk, and a gal I saw at the fuel pumps.
 Candy Bar Wrapper Details: I got the pattern for creating the candy bar wrapper from a convention trade. I used Close to Cocoa cardstock for the candy bar wrapper, it is stamped with little coffee beans. I created the belly band using Regal Rose cardstock, stamping random hearts from "Like it a Latte" stamp set. I stamped the little cocoa cup on Whisper White cardstock with Close to Cocoa, popping up a heart for some added fun and pink marshmallows. The best part of all is the chocolate bar, everyone loves chocolate.
Measurements for the candy bar wrapper: 5 1/2"x 6" Scored 1 5/8" on both ends of 6"side. Decorate and put together using sticky strip on the bottom and on one side as you fold together. Crimp bottom for added texture. Belly Band: cut 2"x 7 1/8" stip, fold in half, crimp ends. I also used 1 1/4" hole punch, punching a half circle at the top of wrapper for easy access to the chocolate! I created a Halloween version and sent them to school with my kids, everyone loved these. The best part of this template is you can create 2 with each piece of cardstock.
Thursday, November 16, 2006
"Welcome Little One"
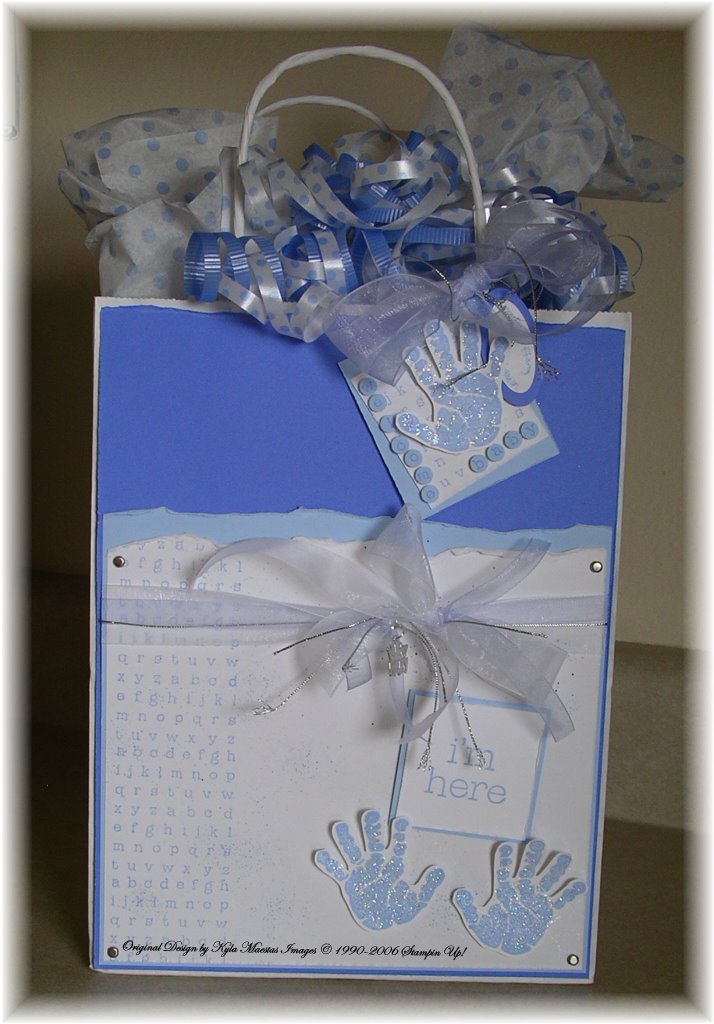 I have discovered that my mom gets me stamping more and more these days. She stopped by to help me finish shopping for the kid's birthday parties this weekend. She mentioned needing to put together a baby gift for a baby shower tonight. We found the cutest little train outfit from Wal-mart and picked up a white bag, polka-dot tissue paper with coordinating curly ribbon. (All other supplies used are Stampin' Up! unless otherwise noted)
When I started putting everything together, I discovered that the gift bag was not bright white like my cardstock, it was a very dirty shade of white. I decided to cover the entire front of the bag with cardstock, allowing only a small portion of the bag to be seen and layered cardstock from there.
I cut out little hands for the bottom of the bag and for the tag, punched out "welcome baby" using the alphabet block from the "I'm Here" stamp set, put them on tiny pieces of foam tape and popped them up for the greeting. I added tons of glitter and ribbon with cording to accent the bag. Brads were added in the corners to tie in the metallic look and to also adhere the panel to the bag. I used a small charm from Wal-Mart to finish the look (charm says new baby). The saddest part of this project was watching the original head out the door :( I did take pictures so I can recreate this bag for future baby showers. Enjoy Mom!
"Creative Meeting" Demonstrator Training
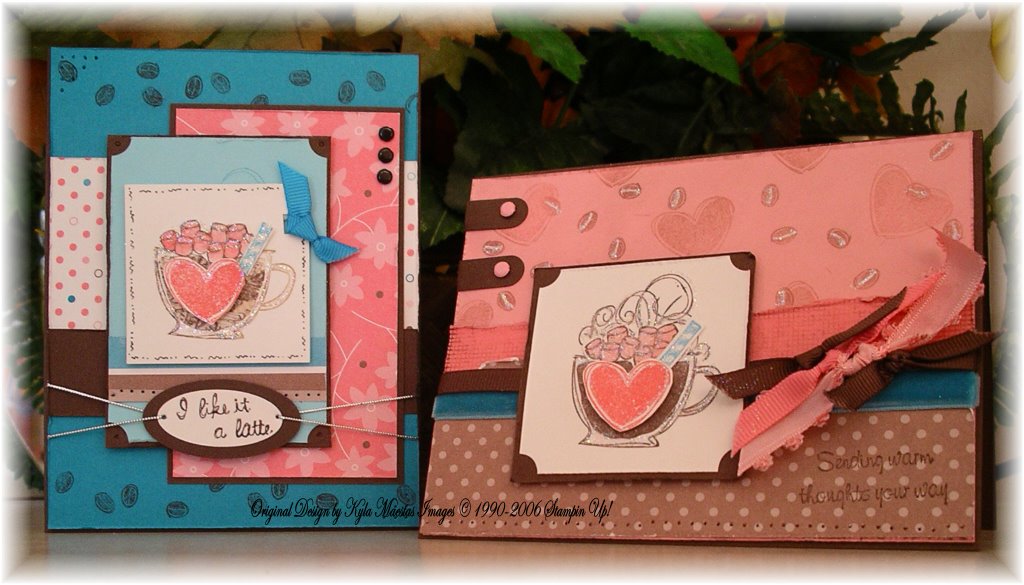
This morning I scheduled to get together with my downline. We have a business meeting once and month and decided to throw in a second meeting to allow us time to focus on the fun stuff.... stamping!! I thought I would attempt to turn one of our ATC cards from our business meeting this month (see technique book) into a card showing the girls yet another way they can use what they are learning in class creatively. I also tried to use several of the techniques we had featured in the technique book on the projects for today as well. I am really excited to share these fun projects with my team. Our creative meetings consist of 2-3 advanced stamping projects. These meetings allow me time to focus on lots of creative details and techniques.

"Like it a Latte" card features the Faux Shaving Cream ATC from our previous meeting (see Technique Book). I clipped off the corners with the ticket punch and layered it onto the card with designer paper from the new Winter Mini Catalog. I used my new oval punches, I am very excited to add these to my collection, to help the sentiment stand out a little bit more for this card. It was a lot of fun to layer the ATC on this card, I am very pleased with the outcome.
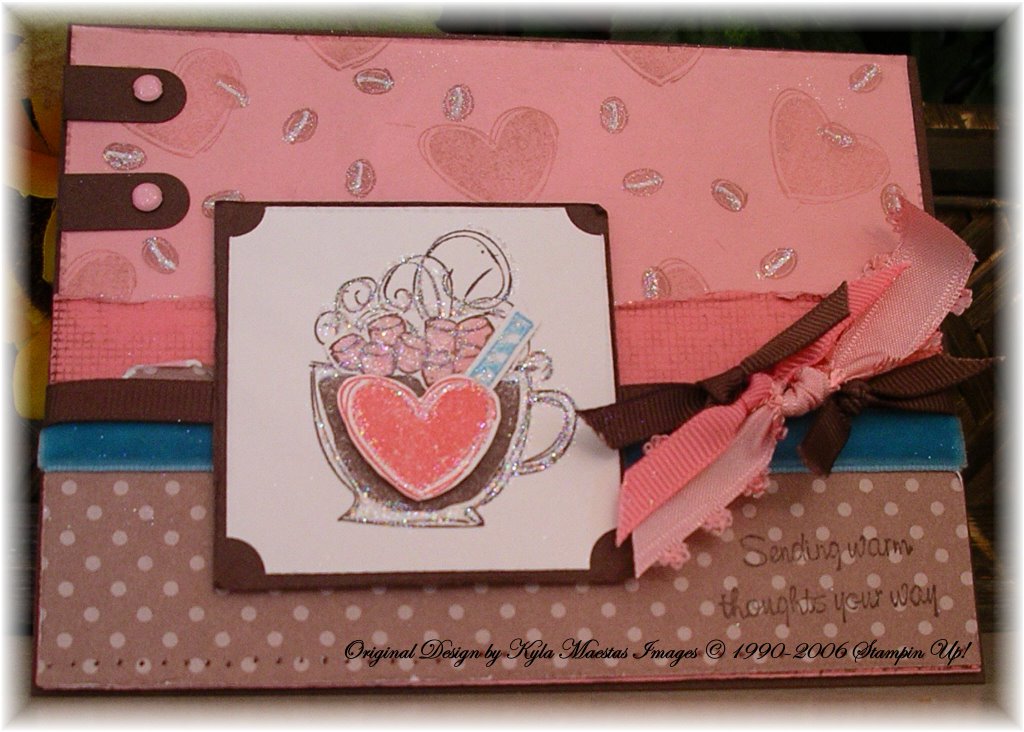
"Warm Thoughts" features the Poppin' Pastels technique from our previous meeting (again see technique book for details). The hearts on the background were stamped with pretty in pink classic ink, the coffee beans were stamped with Versamark and chalked using Poppin' Pastels technique. I also used the chalk to add a light distressed look to the cardstock. I highlighted the coffee beans with the white gel pen and added glitter.
Wednesday, November 15, 2006
"Out of Season" Cleaning the Office
 I have been so busy working on Christmas Card orders and getting ready for the holidays. My stamping space is showing signs of neglect, it is piled high with scraps of paper, cards and projects from recent classes, umounted stamps everywhere and clutter galore. I have spent an hour already this morning cleaning putting things away. I stumbled across a few scares along the way... this is a gift set that I created for my kid's teachers as well as the principal/ faculty of their school. My kids and I also delivered several of these to unsuspecting friends and neighbors for a fun and spooky treat.
Inside each bag there were small bags of microwavable popcorn, a cello bag with marshmallow ghosts, and lots of chocolate.
"Forever Yours" Wedding Invitation
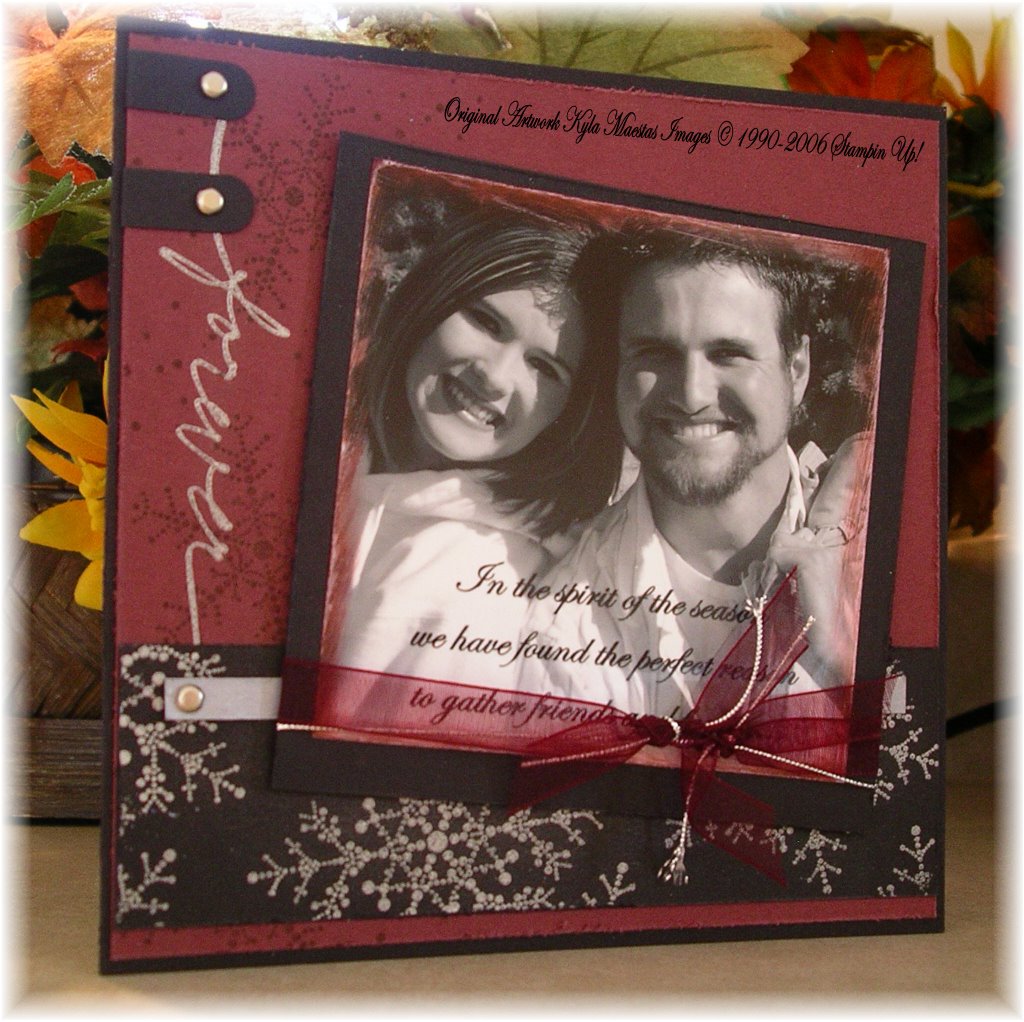 I was recently hired to design a wedding invitation for a friend/customer of mine. Her daughter had planned for a winter wedding and thought it would be fun to send out hand stamped wedding invitations with a winter theme. I have several passions/hobbies (card making, scrapbooking, and photography) and thought this would be the perfect project to wrap them all up into one.
 I designed this card using their wedding colors (black and burgundy) using one of my favorite winter sets, Snowflake Spot. The snowflakes are embossed with silver embossing powder along with "forever" from Wonderful Words II.
To give this invitation the right feel I decided to take the engagement photos myself, this allowed me to play with the digital effects and add an inviting sentiment to the front of the card. The photo reads "In the Spirit of the season, we have found the perfect reason to gather friends and family". The edges of the photo were sanded off to create a distressed look and bravo burgundy ink was added around the edges to add a little color and enhance the scratch marks left behind from sanding. I am very pleased with the way this invitation turned out and the bride and groom to be were pleased as well.
My friend and her family have been busy at work creating over 200 of these to send to friends and family to share in the blissful union of her daughter and her soon to be husband. This was a fun project.
Festive Favorites "Couple of Flakes" Continued...
 As promised, here is the paint can I designed to match the Festive Favorites card. This was a lot of fun to create. I am thinking about creating a set of these for each of my kid's school teachers. I would like to fill them with poems (stamped to match of course) with Snowman Soup and all the supplies and goodies to make it (chocolate bar, marshmallows, cinnamon stick, and of course the cocoa mix). I also have an amazing recipe for Amaretto Cocoa mix that would be a fabulous addition to something like this. I have had these sitting on a shelf in my stamping area and absolutely love the festive feel they give my office as the holidays grow near.
Monday, November 13, 2006
Festive Friends "A Couple of Flakes"
 My mom purchased this stamp set (Festive Favorites) and I promised I would help her create something fun with this set. I have been in quite a stamping slump (just not in the mood) and my mom came over to force me out it about a week ago. She was a great motivator and reminded me what it is exactly I love about stamping... creating fun projects to share with others (thanks Mom, I really needed the encouragement). We created a matching paint can and assorted tags to match (*Coming soon).
I am really regretting not purchasing this stamp set for myself, my mom will be tickled to find out that I will be adding it to my next order, it is not everyday that she talks me into buying stamps, it is usually the other way around LOL.
So enough of the chatter, lets talk about the card details. This card features an assortment of stamp sets including the "Flannel" and "Canvas" background stamps. The "Flannel" background stamp is stamped in cranberry crisp ink on sahara sand cardstock. I layered the snowflakes (Festive Favorites) over the top in chocolate chip and filled in the circles with a white gel pen. The "Canvas" background is stamped in chocolate chip ink on chocolate chip cardstock to create a subtle background. As you may have noticed from my gallery I love the word window punch and use it often, the antique brass brads seem to tie in perfectly.
I stamped the trees first and colored them in. You cannot tell by the finished product but the snowmen were added to cover up a mistake. After spending a great deal of time coloring in the trees I noticed a finger print. I had already layered all of the pieces and had done the paper piercing. I was not about to start over... so I did what I do best and started adding layers to hide my mistake. The snowmen fit perfectly in front of the trees to create the perfect winter scene. I had to add the "Riveting" circle and mount to finish things off. I did not like the tree in the center of the stamp so I decided to cover it up with a little snowman face. And of course no card I create is complete without oodles and oodles of ribbon and tons of GLITTER so I grabbed several strands and started tying the knots and sprinkled glitter to create the shimmering effects of snow.
Sunday, November 12, 2006
Training My Downline
 I have been doing doing the 6x6 technique books for years. I have seen the ATC cards many times, I have even created a few. Seeing the new OnBoard Trio album at Convention really got me excited about training my down line using these little cards and this beautiful album.
My album is the first book like this I have ever attempted, I have never worked with the Mod Podge before, covering and finishing the album took about 4 hrs, I was surprised at how well it turned out.
 OnBoard Trio Album Details: I covered the book using the new "Loves Me" Designer Paper from the Stampin' Up! Winter Mini Catalog,I absolutely love the look of the new designer paper. I added some sponging around the edges of the cover to achieve that "dirty" look. I wanted to add some of my personality and some layers, so I used "Sweet on You" and the "Headline Alphabet" to design the cover of my technique book, I truly love techniques and I am pleased with the way this turned out. I used the "Flirty" ribbon originals and twine to tie around the binding and to add a little personality.
  ATC Details: I created 6 technique ATC cards for our first attempt at this new format. (Techniques include kissing, fun foam, painted pearls, poppin pastels, faux shaving cream and paper piercing) I incorporated the "Loves Me" designer paper along with several other stamp sets from the Winter Mini Catalog ("Love Matters", "Tagger's Dozen", "Like it a Latte", "Sweet On You")
SCS Sketch Challenge 92

We have had a lot of cold weather in Wyoming but we haven't had much in the way of snow, hopefully soon!
I am new to the sketch challenges on SCS, but I am enjoying the few sketches I have had time to play with. I loved SC #92 and instantly saw flakes, this is by far my favorite of the sketches I have tried so far. I started playing around with one of my favorite color combinations (Chocolate Chip, Close to Cocoa, Cool Caribbean, Very Vanilla) and decided to add a technique (heat embossing with classic ink). With the help of a great sketch this card came to life quickly! I love the way this turned out and look forward to playing with the sketches more.
Card Details: I combined "Crosshatch" and "Canvas" background stamps for one of the back panels, the other back panel features chocolate "Snowflakes" and cool Caribbean "Canvas". The snowflakes were heat embossed with iridescent ice embossing powder. I love the "dirty" look, I sponged cocoa over the card to add the finishing touches.
Metal Edge Tags Contest Entry
 It has been too long since I submitted an entry in one of Stampin' Up!'s contests... I decided to put something together this last week for the metal edge tags category. I recently earned the Riveting stamp set as a hostess and have been looking for a way to use it for holuday cards. I haven't ever won a contest with my work but I am hopeful that someday I will, in the mean time it is a great challenge, and continues to force me to use products that I normally would not use. I have had the metal edge tags for over a year now and haven't created a single thing using them. Card Details: I used "It's Snowtime" and "Riveting" with the new Holiday Designer Paper from Stampin' Up! and coordinating cardstock. I did a lot of layering, cutting out the snowman and snowballs to create dimension and a fun winter scene.
Subscribe to:
Posts (Atom)